Welcome Home – Is What Your Front Door Says
The threshold to your home and entry to your family sanctuary.
This is where first impressions can be lasting impressions.
From the very first look – your entry door invites friends and family into your world. Maintaining its appearance for aesthetics is important for every step of the way home.
Many will shy away from taking on this project because it seems overwhelming to them.
But with the necessary knowhow you can beautify your doors in no time at all – and with great results.
The “Two-Step” of door reconditioning are:
– Painting new or repainting existing
– Finishing or Re-Finishing existing
What you will need before you start:
– Exterior paint / varnish
– Primer if necessary
– Sandpaper, 150-320 grit
– Small toothbrush size wire bristle brush\
– Paint remover, if necessary
– Heat Gun if necessary
– Paint Scrapers. 1-2 inch and 3-4 inch
– Painter’s tape
– Paint brushes, roller, lint-free rags
– Paint tray, drop cloth or plastic sheeting
– Screwdriver
– Padded saw horses
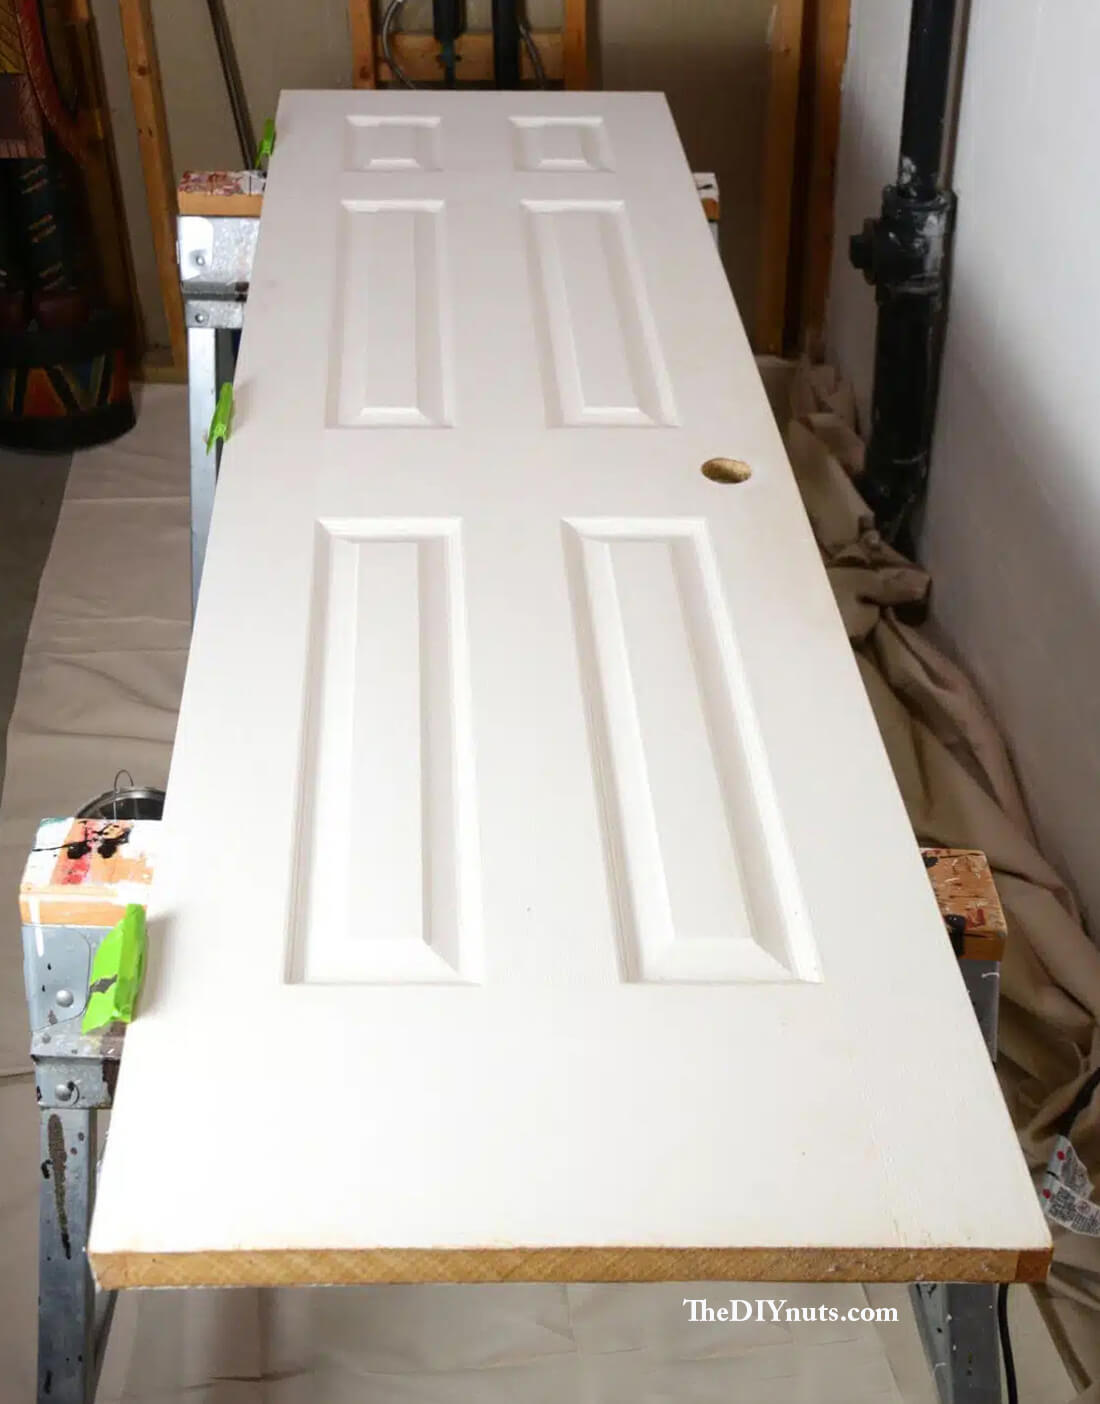
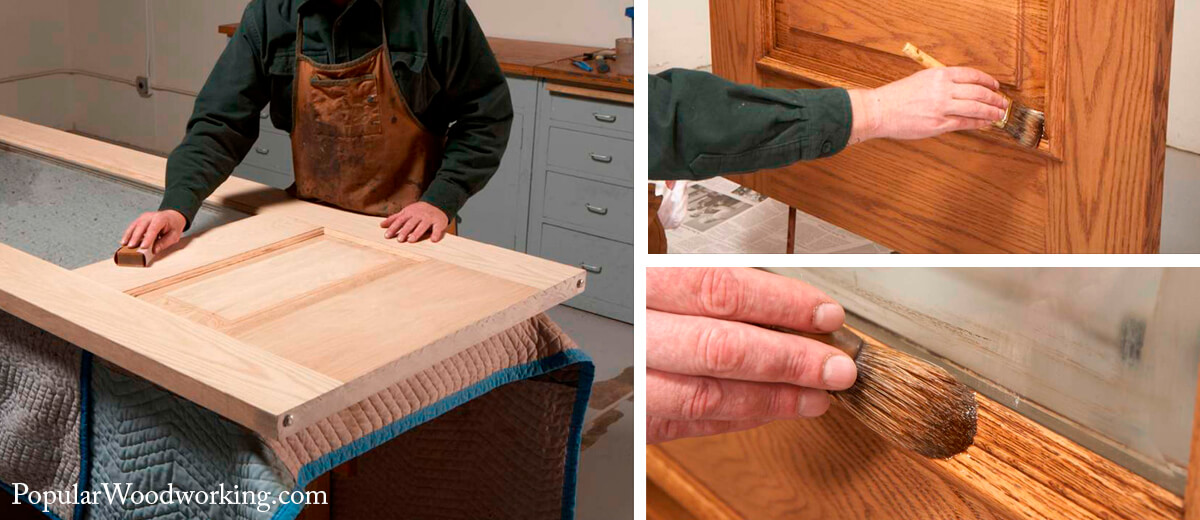
For more detailed preparation, it is best to take the door off its hinges and lay it horizontal on a couple of saw padded horses.
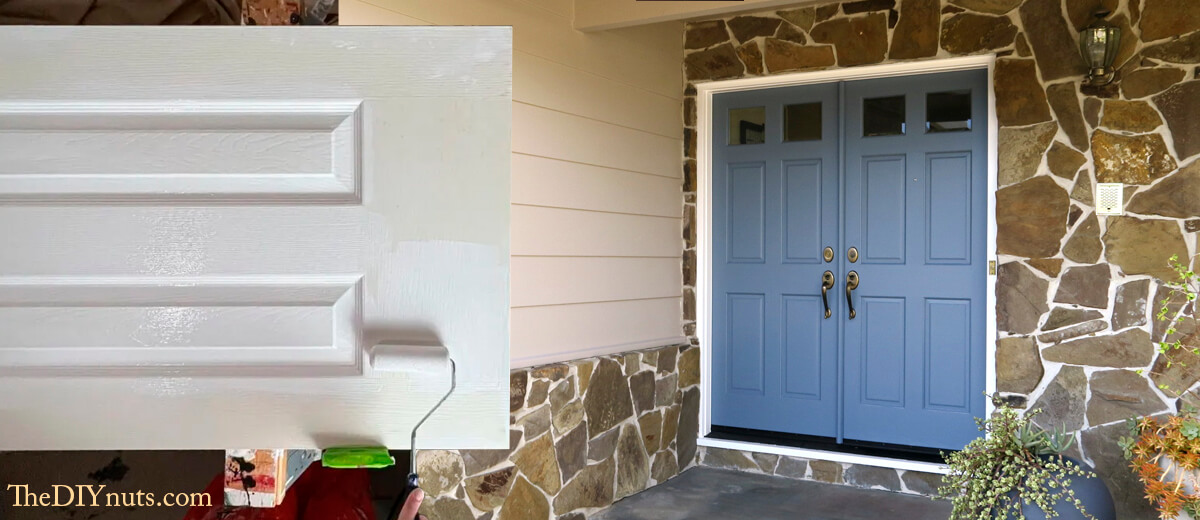
Painting your entry doors, or any door.
Your doors will probably be a wood, steel or fiberglass product. This article guides you through rolling and brushing. If you are spraying your door, you may be an experienced DIY, or trained professional and the prep will be the same.
Selecting your paint.
The best paints to use will be Latex, oil-based semi-gloss or gloss. Yet for more heavy use and harsh weather conditions, you may find that a single component epoxy paint is your best bet.
It is always good to consult with your local and regional paint professional before making your choice.
Prepping your door:
Word of advice – Depending on how much preparation your door needs:
Do not paint or varnish in direct sunlight.
- For light duty prep, you can leave the door on its hinges. Either taping off hardware or removing it.
- For more detailed preparation, it is best to take the door off its hinges and lay it horizontal on a couple of saw padded horses.
Timing is everything – If a one-day project is your goal, and you’re looking to rehang your door by nightfall, you’ll have to get an early start on the prep and be prepared to make it a two day if the prep takes longer than anticipated.
You never want to re-hang your door if it is not completely dry, to avoid any unwanted fingerprints, or sticking to weather stripping or jambs.
Because you are painting on the horizontal surface, with semi-gloss or gloss latex, acrylic, oil-based enamel, or epoxy, you will find that the paint will lay on the surface better and will be smoother to the touch when dry.
Depending upon the condition of your door will determine whether you will only surface sand and scuff or remove paint entirely back to original door material before you paint.
Before you begin the prep, take off any door hardware like handles, deadbolts, lock latches and hinges.
Door Projects:
Light duty regular scheduled maintenance coat:
If your door has only weathered a bit and you are doing a maintenance coat on top of the existing paint, you will only need to sand lightly to re-smooth the surface, clean well and paint. Often, if you are only applying a maintenance coat you can leave door on hinges to save time.
Here you will need to mask doorknobs, windows and hinges. Then use a 180-220 grit sandpaper on a flat sanding block for your flat surfaces and an equivalent grit scuff pad for any details like panel edges and reveals.
Once sanded – run your hand down the surface to check for any rough spots you may have missed and re-sand those areas. Then wipe off and dust thoroughly – then wipe down with cleaning solution to remove any residue or oils left on the surface. If you are familiar, you can use alcohol or denatured alcohol before you paint. Be sure your cleaning solution is completely dry before applying paint to avoid bubbling.
Minor repair for doors not maintained regularly:
If there are noticeable scuffs, dings, cracks, minor peeling, or dents, then you will want to apply the appropriate Bondo or filler to patch the imperfections before you paint. When using Bondo or fillers, it is best to prep and prime the door first and then apply the Bondo or fillers. The primer gives you a more substantial base for the fillers to adhere to.
Neglected and Extremely Worn and Damaged Doors:
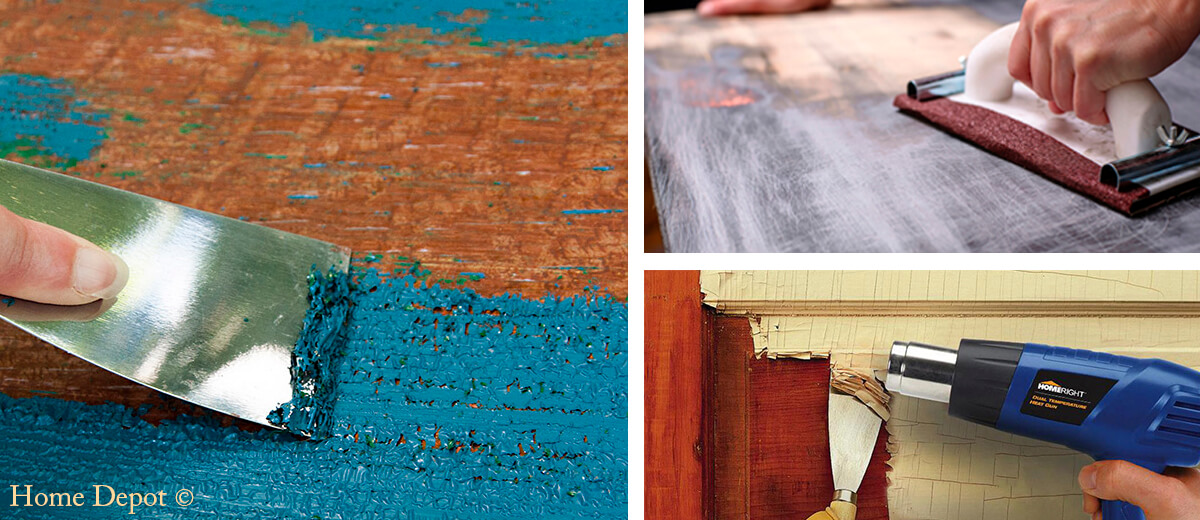
For extreme surface damage over any large area of the surface, such as heavy peeling, weather checking or other deep surface damage, you will want to remove all the paint.
Check out these helpful links to further your knowledge base before you begin.
Visit Home Depot link for great tips on paint removal.
The DIY Nuts has great insight on door painting as well
Using a paint remover solution, heat gun, or sanding equipment, remove old from the surface. Using a paint scraper and at least 80-150-220 grit sand paper with equivalent scuff pad – scrape off peeling paint and rough patches – then sand back to stable surface material. Once you have removed all the paint, be sure to clean the surface thoroughly to get any residue from paint remover off or out of the surface.
Important Note: Be sure to follow cleaning instructions on paint remover label for best results.
Once the surface is clean – repair any dips, dings, gouges, or imperfections. If repairing dry rot in wood, be sure to use a penetrating epoxy and compatible wood filler to bring door shape back to normal. Be sure to allow the proper time for epoxy to cure.
Now that you have repaired all the imperfections – sand with 220 grit sandpaper and scuff pad bringing the surface back to a smooth-to-the-touch feeling.
Wipe off dust and residue with clean dry rag – then wipe down again with pre-paint solution, alcohol or denatured alcohol – wait for surface to dry before you apply primer and paint.
Applying paint to your well prepped doors:
Usually, people will only repaint the exterior of their doors. If you decide to do both sides, remember to hang plastic on your home door opening to keep the weather and critters out while you are repainting.
Remember to let one side dry completely and hard to the touch before turning over to do the other side.
To begin with – assess the architecture design of your door. Is it flat surface, or does it have the “lites” (an architectural term for simulated glass panels on a door) and architectural detail reveals in it. This will determine if you roll only, or brush and roll. See below…
How many coats of primer and paint? Roller or brush?
TIP: You may find a lot of informational videos on YouTube or Brand Name Paint Websites. This in combination with what you will learn from this article should give you the satisfaction you are looking for.
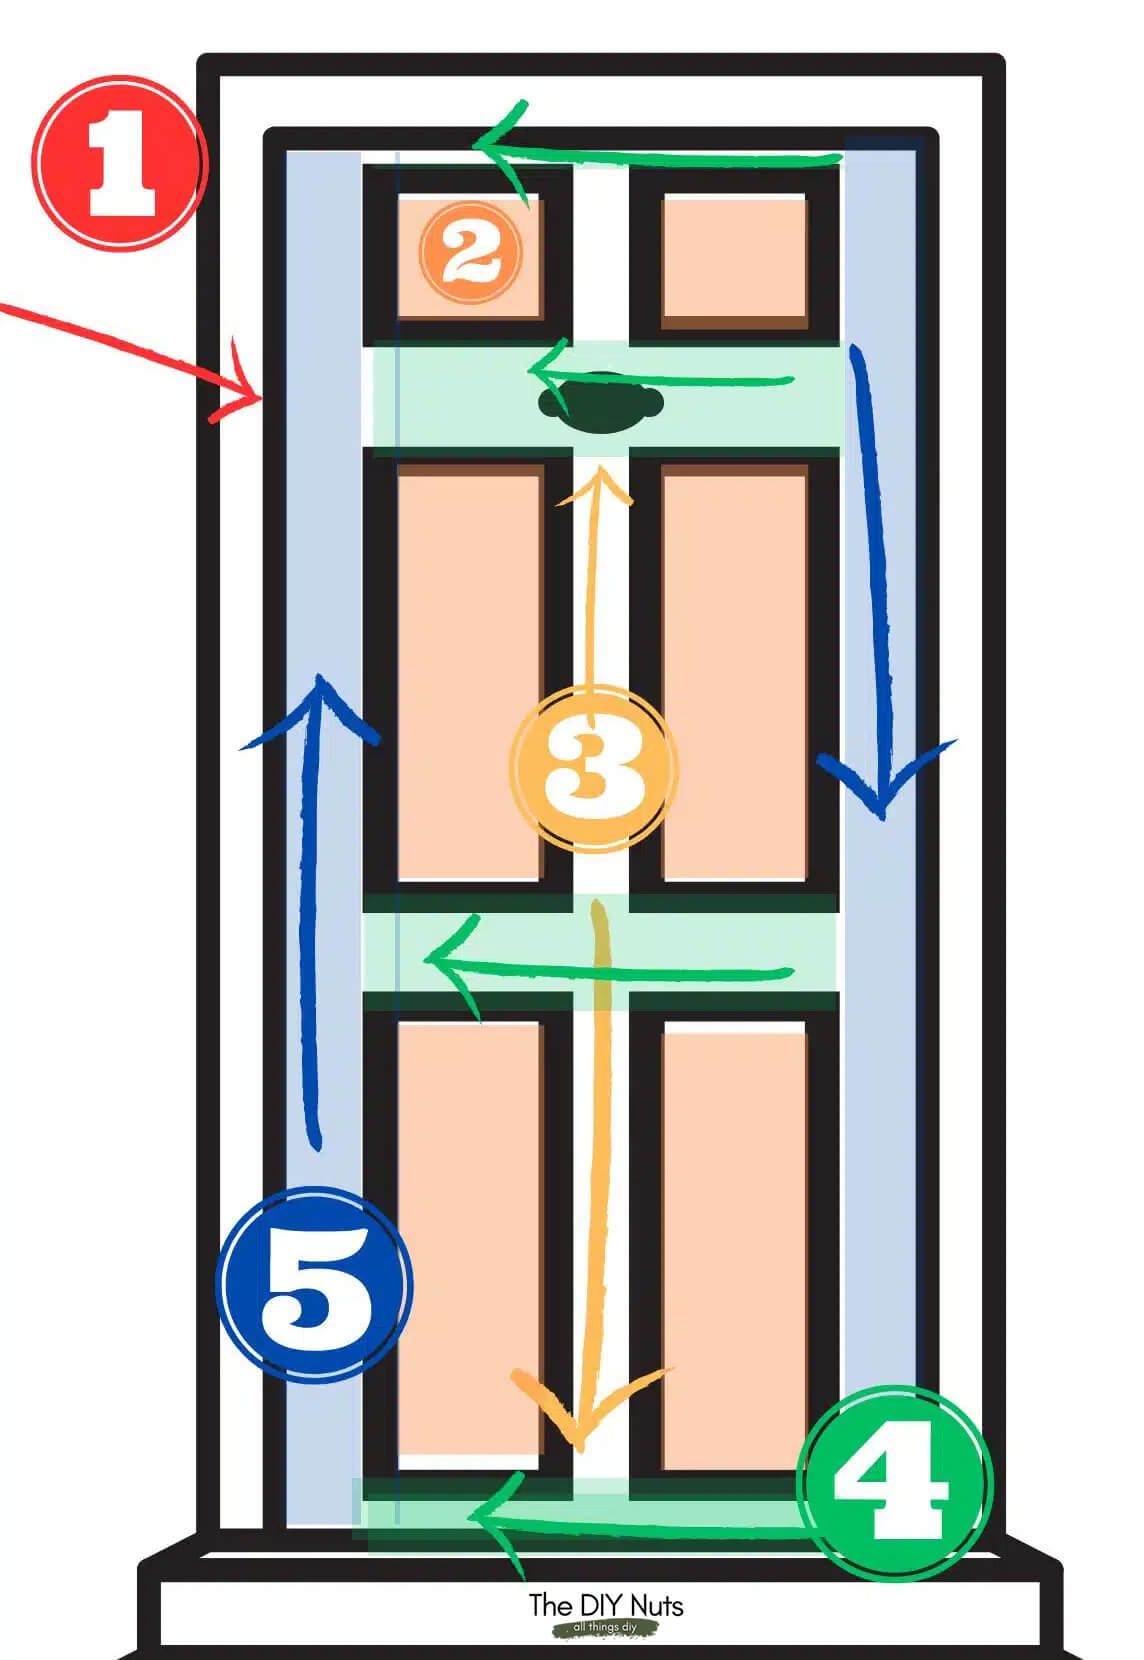
1. Paint Outside Edge
2. Paint inside panels
3. Paint the vertical panel in the middle
4. Paint across horizontal panels on your door
5. Paint outside vertical panels
For One coat – Flat Smooth Surface – No Primer – If you are coating your door over existing paint with no primer coat, then one coat may be all you need. If your door is flat surface only – then you can roll on your paint with ease, with little or no complications. Rolling applications are typically used by painters when the finish is not critical.
Rolling paint only – or rolling with back brushing:
Rolling only: Be sure to roll from one end of the door to the other with a smooth push or pull on the roller with even pressure.
Rolling with back brushing: Be sure to roll from one end of the door to the other with even pressure. Then, as soon as possible, run your brush down the length of the door to smooth the rolled paint.
Once coated – Leave it alone to settle and dry before re-hanging. Be sure to let dry and cure thoroughly before
re-hanging. See paint instructions for more information.
Two or more coats – Doors you’ve repaired with fillers. Primer will be necessary here.
As a standard “rule of thumb” it is always best to prime any surface that has been repaired. The primer will seal any imperfections you may have overlooked and give the door the uniform smoothness you need to apply paint.
Once the primer has set and dried – Sand with 220-320 grit sandpaper on sanding block and scuff pad if needed, to smooth out the primer before you paint.
Wipe off dust and residue with clean dry rag – then wipe down again with pre-paint solution, alcohol, or denatured alcohol – wait for surface to dry before you apply primer and paint.
Applying the paint over primer:
Two coats of paint are usually applied over primer. One coat to settle into the primer and the second coat to seal the deal and give your surface the smooth look of the semi-gloss or gloss paint.
Once you have achieved this – let your door sit and dry completely before hanging.
Remember again: Always give your paint the proper amount of time to dry, depending on temperature and humidity, before re-hanging in the jamb.
Re-finishing (stain & varnish) Your Existing Wood Door

Check out these helpful links to further your knowledge base before you begin.
Scheduled maintenance varnish coat:
If your varnish is fading from excessive exposure to sun and only weathered a bit, you can do a maintenance coat on top of the existing varnish if it hasn’t started to peel, and the sun hasn’t eaten into the existing coat to deep.
Sanding first
With a 220-grit sandpaper on sanding block and scuff pad, lightly and evenly sand your surface to get rid of weather wear on the door. Apply a bit more elbow power when needed. Sand any blemishes that have dug through the varnish and stain – then sand and smooth around the edges so it is a smoother transition to new varnish than the sharp edge.
Color matching scuffs and blemishes:
First you will want to identify any shallow blemishes or scratches that may need a touch up of a matching stain color before you re-varnish. If you don’t have the original can of stain, you will need pick up more, or a color chart from your local paint or hardware store and hold the color swatch next to your door to color match. Chances are that the color will not match exactly, but hopefully close enough to notice unless you are inspecting the door.
With a clean small brush – like a artist painter brush, or cotton swab, or lint-free rag – dip into stain and re-color the blemish. Here you can add or wipe off stain to achieve your best color match.
Once stain is, dry you can determine if it needs another, or another build-up coat to bring it into a better color match.
Build-up coats are best for varnish
After you have blended the stain as best you can, you may want to apply a couple build-up layers of varnish over the blemishes to bring the varnish back to the same thickness as the existing door…or not, depending upon the depth of the blemish.
Now that the blemishes have their built-up layers of varnish, continue to evenly sand the entire door with
220-320 sand paper and scuff pads accordingly for a clean and smooth surface.
Cleanliness is a must:
Just before you varnish, wipe of surface several times with clean lint-free rag because varnish dust is very fine. Then finally wipe down with rag soaked with cleaning solution, alcohol, or denatured alcohol. Alcohol products remove any residue and leaves the surface extremely clean, which will help the varnish adhere better.
When cleaning before varnishing – “Wipe easily to clean surface…DO NOT RUB hard over surface.
Once the surface is completely dry, apply the first of consecutive coats of varnish.
Let dry completely and then apply second coat. When second coat dries, feel the surface with the flat palm of your hand to determine if this is smooth enough for you, or decide if you want to continue building up coats, or leave as it is.
Extremely Weather Checked, Cracked and Worn Wood Doors:
Here in this case, where minor blemish blending is out of the question, you will want to remove all the existing varnish to expose the bare and natural color of the wood.
Is minor door joint repair between stiles and rails necessary? Before you remove existing old varnish.
If you have minor separating at the joints – clean the joints well down into the seam to remove any residue. Then apply a bead of wood glue or epoxy into the small open gap and use a furniture clamp to compress the door until glue or epoxy cures. Once cured and set – begin your varnish removal off the door surface.
Using a paint remover solution, heat gun, or sanding equipment, remove old from the surface. Using a paint scraper and at least 80-150-220 grit sand paper with equivalent scuff pad – scrape off peeling varnish and rough patches – then sand back to stable surface material. Once you have removed all the varnish, be sure to clean the surface thoroughly to get any residue from paint remover off or out of the surface.
Sometimes, at your discretion, bleaching may bring the wood back to nearly normal color:
Helpful videos on removing stain and/or bleaching wood before staining
Now clean bleached wood to remove bleach residue.
Sanding with 220-320 grit sandpaper along with the same grit scuff pad will give you a clean smooth surface that is ready for your first coat of stain. Remember to run the palm of your hand over the surface to be sure it is smooth to your liking.
Now wipe off dust and residue with clean lint-free dry rag – then wipe down again with cleaning solution or alcohol / denatured alcohol – wait for surface to dry before you apply your first coat of stain.
Applying Stain:
With fine hair brush (3 or 4” wide) or stain-soaked lint free rag begin to evenly apply your first new coat of stain. Be sure to brush or rub in stain with the grain of the wood. Long strokes or long smooth rub-in with your rag will give you the most even coloring. Repeat this process until you achieve the color and balance you desire.
Allow recommended drying time and then varnish.
Note: Wear protective gloves to keep stain of skin, as it could be an irritant and is definitely hard to wash off.
Once your stain is dry, wipe with dry lint-free rag to get ready for varnish.
Applying Varnish:
Your best tools for applying varnish on your door is a 3-4” wide natural bristle brush. Some brushes are made specifically for varnish.
1. Paint Outside Edge
2. Paint inside panels
3. Paint the vertical panel in the middle
4. Paint across horizontal panels on your door
5. Paint outside vertical panels
For a door with architectural lites or reveals – First brush inside the small lite panels – then finish with the styles and rails.
If a second or third coat are needed – repeat steps above but be sure to apply within the recommended drying time, to assure better adhesion to your prior coats.
See varnish can instructions.
Structural Note: Should you have dry rot on your door, it will usually be at the bottom which is closest to the threshold plate. This is where the most moisture build up affects the wood of the door.
Depending how bad the rot is, you will need to make the decision to either replace the door, or to repair the rot area.
If you choose to repair – Understand that because of the repair – this area of the door will no longer match the look and stain of the rest of the door. One option is to have a metal or wood kick plate made as wide as the door to cover the rot repair. This is sometimes the low cost way to prevent the huge expense of a new door.
If you decide you are not up for doing this yourself, we’ll include your Door projects into our House Painting Estimate for you to review.
El Gato Painting has the knowledge, track record and reputation to do your project right. The first time.
Topics we will discuss with you before you hire us.
- We’ll furnish you our complete list of satisfied customers.
- Verify we are licensed and insured.
- Agree with you in writing on price and responsibilities.
- Be sure you get our best warranty for the work.
- Make sure we use high-quality materials and paints.
- We’ll carefully go over our 21 steps of preparation and application.
- Welcome your questions and concerns.
- Look forward to your final inspection of our crew’s excellent work.
Please visit our Certification pages:
– Google Page for our long list of 5 Star Ratings.
– El Gato Painting Services From our website here
– Reviews for the company Customer testimonials from our website here
This will give you the peace of mind that you have hired trustworthy and reliable professionals.
Contact El Gato Painting Services today and get a free quotation!

Click on Cat to PRINT
The El Gato Difference brochure


Comments are closed.